 Posted by Logan Snyder on August 17th, 2018
Hello and welcome to another episode of “hasOptimization Explains the Internet”! Today we’re talking about my personal favorite topic, Google Analytics.
Google Analytics is the most widely used tool for website analytics. It tracks a vast amount of data points about your site, your users/visitors, and ultimately, it tells you a lot about your marketing and the overall success of your website. We LOVE Google Analytics here at hasOptimization, and asking for access to your site data is probably one of the very first technical-ish things we will ask about when you first become a client.
Today, we’re not going to be digging into the massive amount of data you can get out of Google Analytics, or even how to set it up. Nope, we’re focusing on one small but really important thing: how to give access to your Analytics in a way that is security-conscious, efficient, and doesn’t make you want to pull your hair out. Why? Well, because this is a task we have to ask you to do for us, when you become a hasOptimization client, and it also may be a task that you need to do to give access to employees, other people involved with your website, or even your own new email address.
Why not just set up “mycompanyanalytics@gmail.com” and then give that login out to anyone who needs it? Well, what if you need to remove one person’s access later? What if someone gets fired? What if you lose access to that email address? Using a single login for Analytics is inefficient for users (they need to sign into that account alongside other accounts they might ALSO need to be using) and potentially a big security problem. Giving users individual rights gives you control, security, and ease of use.
Let’s break it down:
- First, you need to log in to an account that has Manage Users rights on your Analytics setup. Go to analytics.google.com, and log in with your Google ID (which might be a gmail address, but it’s more likely, if this is a business Analytics account, that it’s your business email).
- If you’ve picked the right ID, you should now be looking at a screen that contains some data, and has your company name at the top of the page (if you have access to more than one Google Analytics account, you might see a different company name, but there will be a drop-down to select the one you want to access). If you see a screen prompting you to set up a new account…sorry, you’ve logged in with the wrong user ID. Sign out, try a different one. Many of us have a lot of Google IDs without even realizing it.

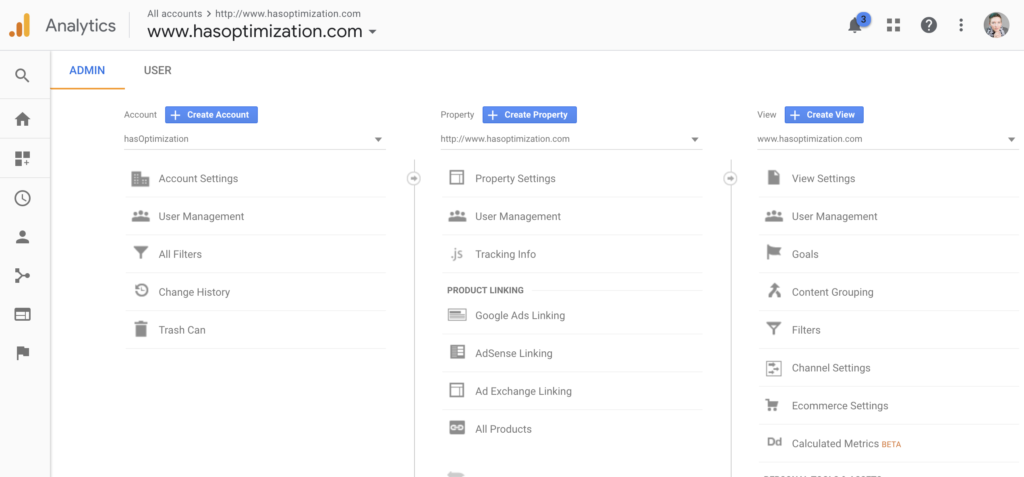
- Once you’ve found an ID that has access to the correct account, look in the bottom of the left hand sidebar for the Admin option (there’s a gear symbol next to it). Click that!
- You’ll now find yourself on the Admin screen, which has three columns labeled Account, Property, and View. Double check that under Account, it has the name of the business you are trying to give access for.

- Now you need to decide at what level you want to give access. If you give Account access, the user has rights in all Properties (most accounts only have one, so this is academic). If you’re a client giving access to hasOptimization, we will need Account access rights. If you give Property access, the user has rights in all Views. If you give access at the View level, the user can only access that specific View. If you are giving access at the Property or View level, make sure the right one is selected for your needs.
- At whichever level (Account, Property, View) you are working, select the User Management option. A window will slide over your screen showing you the available options for the level of access YOU have and the level of the account you are working at. If you see only your own name/ID and a Remove link, sorry! You don’t have the level of access necessary to share access with other users. You’ll need to try a different Google ID (or contact whoever has full access within your organization).
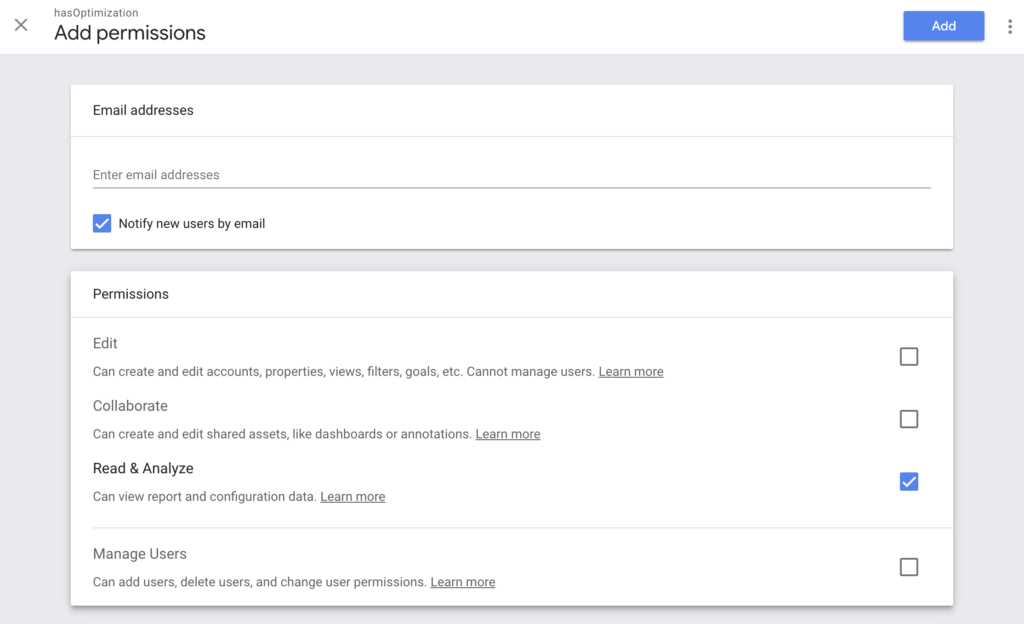
- If you have Manage Users rights for this level, you’ll see a blue circle with a plus sign at the top right of the screen–Click it and select “add new users”. You’ll see a screen that looks like this:

- Enter the user’s email address, then select the levels of access the user needs. Depending on your needs, you might want to give them full or partial rights to access and edit your data. These short descriptions are a little misleading, unfortunately–without Manage Users, you actually don’t have rights to, for example, connect Analytics to Google Ads. If you’re giving access to hasOptimization, we’ll want full permissions–including Manage Users. Check alllll the boxes.
- Once you’ve selected options, click the blue “Add” button. You have a new user! Unless you unchecked the “notify user” button, they’ll get an email letting them know you’ve added them. That said, if you’re adding hasOptimization, please also send us a personal email–sometimes we’re getting several of the automated emails in a single day.
I know this seems like a lot of work and a lot of steps, but it’s actually pretty simple to do once you’re in the system. You can do it in a lot less time than it took you to read this post!


